We make software for the internet.
Software that sells.

Solving a Responsive Design Navigation Problem

Responsive design offers a great solution for those people who do not have a full mobile version of their website ready. With ecommerce it is extremely important that as many people as possible can see and buy your products. After all that is why your site is there. There is nothing worse than having to struggle to use a website on an iphone. At a very minimum your customer should be able to buy from a mobile device. Why would you try and stop them?

One of the biggest challenges we have come across when building responsive websites is how to deal with the navigation. Often on an ecommerce site we have as many categories as possible spread out across the primary navigation. This helps the shopper find more quickly what they are looking for but at the same time it makes it very hard to squeeze it into 320px screens.

Here are three simple solutions to the responsive navigation problem. To help us illustrate what we mean we are going to pretend we the following main categories.
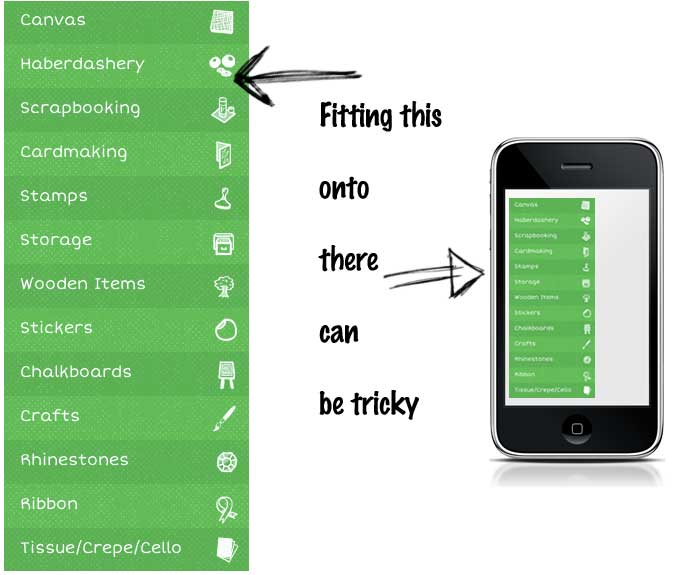
Our rather large responsive menu

With any of the following techniques you must provide the solution within the page and hide it using CSS. Media queries used by responsive design do not provide a way to programatically add page elements as the sizes change. All we can do is show and hide elements with css. This has implications for the complexity of the solutions as we don’t want to increase the page load sizes too much or complicate the site in a way that impacts the users of the other devices.

With responsive design only one page is served regardless of the device so android phone users get the same code base as someone looking at the page in chrome on OsX. It is the code base that adapts the UI based on the device pixel size.
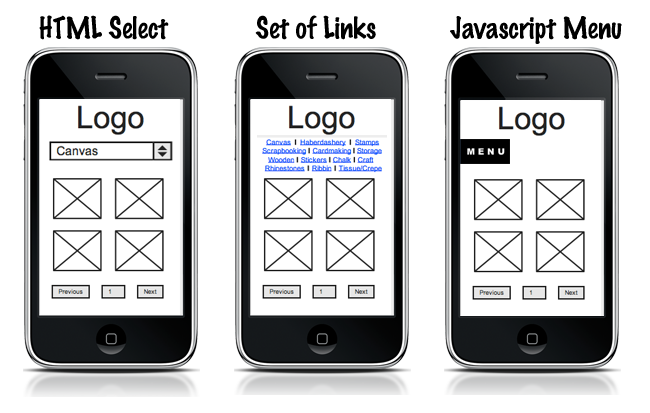
Three solutions

1. Make the navigation a HTML select box

This one is so simple it probably slipped your mind. After all we all stopped using selects for navigation on web sites years ago right? Well this is mobile and we think it makes perfect sense when trying to solved the responsive design navigation problem. No explanation is required as we are all familiar with the select box. Put simply just convert your pixel-hogging mega navigation into a simple select.

Pro’s: lightweight, no learning required Con’s: one extra click to category pages, navigation moves as we scroll

2. Turn it into a simple set of inline links

Again another extremly simple solution that works. We are actually reducing the complexity of the page by stripping out the icons and green background.

Pro’s: simple and lightweight, same number of clicks to content as the original, great for SEO. Con’s: potential to use too much space, navigation moves as we scroll

3. Hide and replace with a menu button

This is the most complicated solution and requires a little bit of extra effort. When your screen becomes phone size we hide the navigation and replace it with a small floating Menu button. Let the user click this to reveal the full menu again, but only when they want it. The rest of the time there is no main navigation. This is nice because as the user scrolls the navigation stays on screen.

Pro’s: completely removes navigation from page saving a lot of space Con’s: requires learning, not a commonly used tool. Navigation stays on screen the whole time.

And the winner is …

If you want us to pick a favourite I would have to say give it to the HTML select box. Quick and easy to implement with the added benefit of all your users just ‘getting it’. Use this in conjunction with ‘back to top’ links to save on scroll time when users need to navigate.

If we’ve missed a great idea or you think you could do it better, leave us a comment. We reply to them all.

How We Optimise Images for SEO and Fast Page Loading Times

Here are bleep systems we have a number of simple core values that run through all our product design decisions when adding features and functionality to our products. Two of those values are speed and search engine optimisation (SEO).

Product photography and images are an important part of any ecommerce system. Images can be tricky to handle especially when you are dealing with tens of thousands of them at many different sizes. Any small nudge that you can give to your site to help search engines find and index more effectively the better.

We’re not saying that you won’t sell anything if you don’t follow these steps but you must be doing at least the same if not more than your competitors. We love the the lion anecdote in this article that describes perfectly the situation all ecommerce sites are in.

Like many whitehat techniques there is nothing groundbreaking about what we describe here but it is important to get the right foundations before you can build any higher. Its amazing how many people don’t get these right.

Our commerce platform automagically takes care of all of these jobs freeing you up to concentrate on other things.

1. Resize for all image sizes and optimise

We use the GD Image library to resize all of the product images uploaded to our system. Storage is relatively cheap these days so its easy to make 6 sizes of images and store them without breaking the bank. While resizing them its important to save them as small as possible (file size) without compromising quality. We set up our scripts to learn what works best.

Another alernative option which we see done a lot is to dynamically generate all the images as and when you need them. This saves on inital processing but we find this slows down the site when its busy. Also see task 2.

2. Serve the static images from a subdomain

The web browser has a concurrent connection limit which it uses when downloading any webpage. As any webpage is made up of multiple requests (css, javascript, images, html etc) this factor can limit the speed to which any page can be downloaded as the browser gets ‘blocked’ while waiting for connections to download.

By using alternate domain names the browser you create more queues that can be downloaded at the same time. An example for images would be this.

http://images.bleepsystems.com

3. Name the image files correctly

There are different techniques to naming images and the method we use reinforces other parts of our on page SEO efforts. We use the department and product name in both the page title, the meta tags, the URL and the H1 - so having them in the images also helps a lot.

The format we use (for each type of image) is

department-product_name-product_code.jpg

Do a quick search on google and you will see lots of opinion the best way to do this and you will get different results depending on how good the rest of your page is, but if the department (or section) and product name is elsewhere on the page this method will work for you.

4. Use Amazon CloudFront (or another cdn)

Content delivery networks do a few cool things. The main one I want to talk about here is serving our images from a geographical location close to the user. If you are just selling locally this might not be the right thing to do, but for those of you selling globally this is a no brainer. Users hate slow sites and this will help yours to fly.

5. Leverage browser caching for images

Product images change infrequently and they take time to download each time you visit the product page. Setting an expiry date or a maximum age in the HTTP headers for static resources instructs the browser to load previously downloaded resources from local disk rather than over the network. Exactly how to do this is out of scope but you can read about how to leverage image caching at Google.

If you are looking for a new ecommerce platform or have any requests for blog articles, please get in touch.

Tools

Two tools for testing your page speed

  1. Google Page Speed
  2. Y Slow from Yahoo

Simple Guide to Product Photography

Making your product photography POP

As with most things, the more you can prepare before you start taking your product photographs, the better. Preparing means first of all, looking at your equipment and your set up, then your products, then the photographs themselves.

Your equipment and set up

A few things here, and I will warn you: you’ll need something a bit better than a point-and-shoot camera. It doesn’t have to be a fancy DSLR but you will need to be able to adjust the shutter speed, the light sensitivity (known in camera world as ISO settings) and the exposure of your camera. Anything beyond that is an extra bonus.

You will also need some lights – but you can use a couple of lamps from home as long as you are able to swivel the light around. If you do use lamps from home, make sure you don’t use those new energy saving globes as the light they emit is too blue/green and will make your products look positively stern and stark.

A studio: you can create a makeshift one of these at home in your bathroom, as long as it’s white and features some natural light and a couple of power points. You will also need a very new white sheet or two, and some masking tape. Surrounding your product with white space is standard practice and will make things much easier for you when it comes to editing your photos later on.

Reflector sheets are more useful than they sound because they eliminate the pesky shadows that will lend darkness to your photos. They come in various diameters and usually are gold on one side and silver on the other.

Your products

Before you begin taking your photos, carefully consider your audience and what you are trying to convey in your product photos. Whatever you do, let your product sell itself and give your customers a reason to stay on your site.

Photos carry a lot of meaning, much of it subtle, so before you start snapping away, ask yourself, is it a photo to show how to use a product? Is it situational and will I need a model? If you are unable to explain to someone in a few words what your product actually does, a simple photo won’t cut it. Take a sequence of photos with a model demonstrating how to use the product or showing what it does. Put the best part of your product at the front and in your customers’ faces: it will be what they remember.

Whatever you are trying to photograph, make sure before you start that it is free of stains, dust, rips, cracks or any other the product, inspect it carefully for tears, stains, cracks, chips or other imperfections before you start snapping away. Try coating sealed products such as hard plastics with a thin coat of hairspray to increase its sparkle and shine. Remember, though, if it is shiny there will be a reflection, so make sure that you can’t see yourself in it!

Next, take some test shots to see how your camera, lighting and studio settings are working. Especially check your exposure so that your photos are not too shadowy or blown out with too much light. Adjust as necessary: reduce exposure if your shots are too bright; increase it for the reverse.

Think about the angle of your shot. It’s true that some folks like to have a photo taken from a certain angle rather than others: this is also true of products. Play around and see which angle works best for your products.

Take a note of the settings that work for your products: this will save you having to try and replicate from the beginning every time you start a photography session. This is especially relevant for your colour control settings, which most DSLR cameras feature. You can usually pick and choose how saturated with colour you want your shots, but if your product is already really colourful, you could try adjusting your setting to a more muted one.

Also make sure that you are shooting pictures in the right image format. If you are only going to be using your pictures online, you can get away with using jpeg format. You can use a RAW format, which is like a digital negative file, but because it contains a truckload more data than jpeg format, it takes up a lot of space and you will need special converters when you touch up your images on the computer.

The next step is to edit your photos. To do this most geeks will have and use Adobe Photoshop or Elements. Elements is easier to use if you are new or starting to learn about digitally enhancing your photography. But there are several photo editing programmes around, some free and some very expensive. By using a photo editing programme you have the ideal opportunity to really make your photography stand out and catch your customers’ eye.

When you edit you can remove shadow, lighten an under-exposed shot, amp up your colour saturation or your contrast; and you can crop or reduce in size the shot itself. This will also be where you can save your photo to the right file format, dimensions and size for your website. It’s a good idea to play around with your test shots in your editing programme for a while first, so you can get a good idea of which editing tools do which jobs.

Once you have uploaded your imagery to your website, make sure that you have also included captions and alt tags. Check, double check and triple check that you have spelled the name of the product correctly in each instance. Poor spelling makes your website seem unprofessional and amateur.

And on that note: one of the basic rules of photography is that the less busy the background, the more focus on the subject of the photo. This is especially true for product images, which should really be cut out, properly masked and presented against a white background so your customers can see the product (most) clearly. Apply this rule consistently to maintain a professional feel to your imagery.

Here is an example of the above techniques produced by Gavin Crossley at The Craft Emporium (site coming soon).

[Great Work Gavin!]

Order Confirmation Email Basics: How to Get It Right

This weeks topic will look at the order confirmation email. More often than not this part of the shopping process gets too little attention compared to the effort that has been put into getting a customer in the first place. Sometimes we find it can even seem like the store has rushed this part and this doesnt help at all with reducing post purchase anxiety. For new customers this is the first time you have communicated with them after taking their money. The more professional this email is the more the customer will know they made the right decision in buying from you. Get it wrong and you’ll end up looking bad. New web stores can be especially vulnerable to this.

First things first

Before we even consider what is in the email - make sure your system is sending emails correctly. By this we mean make sure your server is setup right. This might seem obvious but email can go wrong with very little warning leaving you with a debugging nightmare. The first you will know about this part not working is when a customer calls you up complaining. For new customers this will be the first contact via email so you can not rely on being on any safe senders list.

To make sure your email gets delivered at a very minimum you should ensure:

  1. Correct DNS setup. Make sure you are allowed to send email from your chosen domain at the server IP address.
  2. Make sure the email headers are correct.
  3. Make sure the content is not spammy which may lead to the email being marked as spam by over sensitive spam filters. Have a look in your SPAM box in your email client to see what type of words and phrases to avoid.
  4. Make sure you are not sending from a blacklisted IP. DNSBL

If you want to be sure your email meets all these requirements why not outsource this part of your business. There are some good 3rd party companies who do the email for you. We’ve used both Postmark and Sendgrid and have been more than happy with both. Prices for peace of mind are extremely reasonable.

If we have not managed to persuade you yet and you are really determined to do it yourself read this piece on what good web developers should know about sending email and weep.

Excellent - now the interesting bit about content

[100% 100%] [The Rise of Subscription Commerce]

Email meta information such as

From Name. This might seem like common sense but make this clear. Normally the best option is to put your domain name or the name of your store. It need to be something the customer will instantly recognise. Don’t leave it as the group that apache is running as on your web server like in the above example.

Reply To. Always, always, always make this a real address. There are too many companies using ‘do not reply to this email address’ and we think this is bad. Why would you think it was a good idea to frustrate paying customers and make it hard for them to get in touch? This is an easy win and puts you ahead of competitors with very little effort. Just setup a new email address like support@yourcompany.com and let people use it.

Subject lines Try to summarise what is in the email. If this person also subscribes to other email from your company they need to be able to easily differentiate between the two. This will obviously differ depending on company but we think these are good email subject lines.

  • Your Order Confirmation
  • Your Monthly Invoice
  • Thank you. Your Order Summary is Here.
  • Your Order Summary. This is What Happens Now.

Inside the email

Ask yourself what you like to see when you have just purchased online. You normally need the answers to a few simple questions and to be reassured of a few things. These are nearly always the same for all customers.

1. Summarise what has just happened

Reinforce the purchase with the customer. They may not be looking at this email for a few days after the purchase and it is always good to summarise the purchase.

2. Show the order

This is now the only reference the customer has of buying from you. You must provide them with a list of what they purchased and how much they spend on each item. Amongst other things this helps you if you decide to change your pricing and the customer queries the amount.

3. Describe what to do in case of an error

Mistakes happen and people change their minds. This can even happen 2 minutes after buying something. You should provide easy instructions or a link to page that describes how to change the order. This section might also describe your refunds and returns policy.

4. Describe what will happen next

Tell the customer when they might expect the product based on the shipping they have purchased. If you are selling digital goods, explain where to go to download the product.

5. Sign the email from a real person or team.

We love this one and whenever this happens to us we get a warm and fuzzy feeling! Provide a name and phone number of someone you can speak to if you need. It is as simple as that. Reassuring your customer that there is someone there to talk to will give them massive confidence in your business. If the customer is a regular shopper why not go one step further and attach a support Vcard. I know we love it when this happens.

6. Give your customer an incentive to buy again straight away

We are all in business to sell. Why not include a coupon code with a discount if this customer buys again within a week. If its a big enough discount people will jump at the chance.

If you have anything to say or have any improvements for this article please leave a comment below.

Thanks for reading.

What Is the Best Way to Structure the Checkout Process?

A question that keeps cropping up recently is from customers who want to know the best way to structure the checkout process. Firstly you should never stray from the globally accepted online shopping metaphor which is how all good web stores operate and how most people would expect to buy a product. Some stores insist on putting obstacles in the way like signing in, but all this will do is, well, get in peoples way. Stick with this method and you will be fine.

The normal process to buy something is this

  1. Discover products
  2. Add products to cart
  3. Checkout
  4. Review cart and change totals
  5. Enter details and payment information
  6. Receive confirmation

This article is talking about step 5 or more specifically the journey from 4 to 5 then 6. The customer has a full cart and now they want to pay.

There are two ways of structuring this part of the process.

Bank Hosted

This is where the customer leaves your site and is taken to a 3rd party (normally the bank, but perhaps Paypal) site where they pay and then are taken back to your website for confirmation.

Here at Bleep we find that there is a common misconception that this is less desirable from a user experience perspective. We think it depends. Many people are much more comfortable putting their credit card details into the website of a bank rather than that of a site which perhaps they have never seen before. This might be especially true if your site does not have a physical address and phone number on it.

Another advantage of this method is that the bank deals with all the security requirements regarding credit card numbers and data privacy laws. The merchant never has to deal with any of this.

This route often allows for the hosted bank to implement any additional security checks such as the ‘Verified by Visa’ check. Sometimes implementing the hosted solution is the only way to get such checks as is the case with eGate from ANZ in Australia.

This method although a little more disjointed is perfectly valid and is used successfully in thousands of places on the web.

Merchant Hosted

Most new customers we get often think this is the way to go and the reasons why are obvious. The main one being that all the big etailers structure the checkout process this way. In the eyes of new etailers - if you do it this way you must be a large, successful and powerful. To a certain degree this is true and it is because of this fact that people are willing to give you there credit card details.

With this structure the customer never leaves your site. All the payment forms including billing, shipping and card details done within the brand of the main site. The payment details are submitted securely to the bank and a message sent back.

This structure takes the longest to implement and test from a development point of view. It has the major disadvantage that each time the bank changes their system, or adds additional security it is necessary to spend money implementing the changes. Someone else’s decision to change something can end up costing you money.

If you have any experience with any of the above or you think we could improve the answer to this question then please leave a comment below.

Site Search Analytics in E-commerce (SSA)

Site search analytics (SSA) is an emerging form of site analytics that studies search query data to discover patterns in site use. Here at Bleep we’ve been working hard to understand how to benefit from the information this type of analysis provides which drive users to buying products.

Any searchable ecommerce site is sitting on top of hugely valuable and usually under-exploited data: logs that capture what users are searching for, how often each query was searched, and how many results each query retrieved. Search queries are gold: they are real data that show us exactly what users are searching for in their own words.

The data you obtain from internal search analytics is essentially a resource that tells you what your visitors cannot find on your site. For example, if you sell clothing and you have hundreds of searches for “white t-shirts” but you don’t sell them, it might just be worth looking into selling white t-shirts. If you receive a lot of searches for white t-shirts, but you have a link to your white t-shirts category right on your navigation bar, then there’s a possibility that there is something wrong with your site navigation’s design and effectiveness.

If your top search term is ‘opening hours’ you need to make sure that the right page is at the top of your search results. Studying what users put in and analysing what these search terms bring back will help you a lot. If you can improve the UX and sales by even a small percentage then it has been worth it.

Concrete Ways to use SSA in Ecommerce

  1. To develop useful search system. To do this you need get close up to your search system. SSA will help you understand how people entered searches, where they were when they entered them, and how they interpreted the search results.

  2. Navigation. If certain pages generate more activity than others you need to find out why. Perhaps certain navigational options are missing or are just confusing. SSA asks questions in these areas (which you often may take for granted). What works navigationally for you might not be obvious for others.

  3. To improve your content. Are there any queries that bring back no results? Is this because you lack the content or that the search is in effective in bringing back the accurate results. is the relevant content mistitled? Or poorly written? SSA will help you determine what content is missing and what to do to existing content to make sure it gets found.

  4. To discover patterns. Can you structure the search data in different ways and examine it? Are there any patterns? Can you use those patterns to determine what types of metadata and content are the most important to your searchers? Can you detect changes in seachers’ behavior and needs that are seasonal? Patterns describe behavior.

  5. To highlight failure. When searches return no results or poor results - ask why? And what can we do to fix those problems and improve performance?

  6. To examine user behavior. What happens during a specific search session? How do searchers’ needs and understanding of the content change as they search?

  7. To analyse the audience. How might we uncover the differences between audience segments and their information needs? And how might we better address those differing needs?

Using Google Analytics

With Google Analytics V5 it is easy to get started with SSA. If your website has a search box, go ahead and perform a search to see the URL of the search results. For example your search results might be http://yoursite.com/?s=searchtermhere. Once you have this for your site, click on the settings wheel icon in the top right corner of your Analytics menu bar and find your Profile Settings. Under Site Search Settings, select the option to ‘Do track Site Search’ and enter s as the query parameter (or the one that fits your site’s URL structure).

The Rise of Subscription Commerce

Subscription based ecommerce businesses (“subcom” for short) are on the rise. In a typical situation, a subcom business will send their customers (“the subscribers”) a box full of products on a regular basis. Very often these businesses try to attract customers with specific needs. For example, a subcom appealing to new mothers may send their subscribers a box of baby care items each month.

[100% 100%] [The Rise of Subscription Commerce].